Server Deployment
Updated January 2025
The SAGE3 server can be deployed on a Window, Mac or Linux machine with a fully qualified name and a SSL certificate to support HTTPS. It includes a series of containers running the services required for the SAGE3 platform (using docker compose).
- For reference, SAGE3 is composed of
- `redis-server`: in-memory database
- `node-server`: web server
- `fluentd-server`: logging server
- `kernelserver`: jupyter kernel management
- `jupyter`: jupyter server
- `chromadb`: Vector database for AI services
- `seer`: Python backend for AI services
To update a server, here are the files to keep/move/backup:
- Your assets (images, PDF, movies, …) are in the
configurations/node/assetssub folder.- Files to save if you want to backup your server.
- Your plugins are in the
configurations/node/pluginssub folder.- Files to save if you want to backup your server.
- The database data (rooms, boards, users, …) is in
configurations/redis/data/dump.rdbfile- File to save if you want to backup your server.
Requirements
- Windows, MacOS, or Linux operating system
- Docker installation
- Fully Qualified Domain Name (FQDN)
- i.e. A hostname recognized on a public network or your institutions private network
- Ex. myserver.mycompany.com
- Ex. myserver.cs.university.edu
- i.e. A hostname recognized on a public network or your institutions private network
- SSL Certificates for server (or wildcard certificate for a domain)
- Optional services:
- Google OAuth credentials, for authentication
- CILogin OAuth credentials, for authentication
- Apple with 'Sign in with Apple' credentials, for authentication
- Twilio API registration, for screen sharing
- OpenAI API key, for AI services
Installation
Linux is the main platform for SAGE3 production deployment. MacOS and Windows are supported for development and testing. The following instructions are for Linux, MacOS, and Windows.
Linux
We are mostly using Ubuntu, but the instructions should be similar for other distributions.
- Install Docker for ubuntu
- Do not install
Docker Desktopfor Ubuntu. Instead, installDocker Enginefor Ubuntu - Have a
sudocapable user account (not root)
# Open a Terminal

# Install docker
sudo apt-get install docker.io docker-compose-plugin

# Add the user to the docker group
sudo usermod -aG docker [username]

# Create the new group
newgrp docker

# Close terminal and open a new one
- Test docker installation
# Open a Terminal

# Check docker status
docker ps
CONTAINER ID   IMAGE     COMMAND   CREATED   STATUS    PORTS     NAMES

# Run the test container hello-world
docker run --rm hello-world

# It pulls hello-world image
# It runs the image
# It deletes the container after it is done
- Install NodeJS 20.xx
- Installation using NodeSource repository
# Open a Terminal

curl -fsSL https://deb.nodesource.com/setup_20.x | sudo -E bash -
sudo apt-get install -y nodejs
- Test NodeJS installation
# Open a Terminal
node -v
- Download a SAGE3 server package:
- SAGE3 Linux AMD64 Server Package for Intel CPUs and extract it.
# Open a Terminal

# Move the downloaded file to your user's home folder
mv SAGE3-1.4-linux-amd64.tgz ~
cd ~

# Extract file
tar xvfz SAGE3-1.4-linux-amd64.tgz
cd SAGE3-1.4
- Copy your SSL Certificates to the configurations folder. There should be two files, your PRIVATE key and the CERTIFICATE file
# Open a Terminal

# Copy SSL Certs to the SAGE3 Keys folder. Remember these names for later when setting up the configuration file (step 7).
cp PRIVATE_KEY_FILE ~/SAGE3-1.4/configurations/node/keys
cp CERTIFICATE_FILE ~/SAGE3-1.4/configurations/node/keys
- Generate JWT Keys and Token
# Open a Terminal

# Switch to the SAGE3 Node Keys Directory
cd ~/SAGE3-1.4/configurations/node/keys

# Generate JWT Keys and Token
./genJWT_keys.sh
./genJWT_token.sh
- Edit the
.envFile
# Open a Terminal

# Change directory to the SAGE3 Server Folder
cd ~/SAGE3-1.4

# Edit .env file and add the name of your server and the token you just generated. Leave other variables as is.
vim .env
SAGE3_SERVER=YOUR_SERVERS_HOST_NAME
TOKEN= # token value copied without “” from: configurations/node/keys/token.json
CHROMA_SERVER_AUTHN_CREDENTIALS=...
CHROMA_CLIENT_AUTH_CREDENTIALS=...
- Edit the Configuration file
sage3-prod.hjson
# Open a Terminal

# Change directory to the SAGE3 Server Node Folder
cd ~/SAGE3-1.4/configurations

# Edit the sage3-prod.hjson file with your preferred editor
# The file is documented with instructions.
vim sage3-prod.hjson
- Pull the Docker Images
# Open a Terminal

# Change to the SAGE3 Server Directory
cd ~/SAGE3-1.4

# Pull images
docker compose pull

# Might take a while but results should be:
 ✔ redis-server Pulled                                                                            0.3s
 ✔ node-server Pulled                                                                             0.3s
 ✔ seer Pulled                                                                                    0.3s
 ✔ fluentd-server Pulled                                                                          0.3s
 ✔ jupyter Pulled                                                                                 1.1s
 ✔ chromadb Pulled                                                                                0.3s
 ✔ kernelserver Pulled                                                                            0.2s
- Start the Server
# Open a Terminal

# Change to the SAGE3 Server Directory
cd ~/SAGE3-1.4

# Start Server
./GO

# To Stop the Server
./STOP
Windows
-
Install Docker Desktop for Windows
-
Install Windows Subsystem for Linux WSL using distribution Ubuntu 22.04
# Open Powershell
wsl --install -d Ubuntu-22.04
- (optional) You can install Visual Studio Code WSL Extension to edit files inside WSL.
- Install Node.js within the WSL subsystem
# Open Powershell and switch to WSL
wsl

# Ensure Curl is installed
sudo apt-get install curl

# Install Node.js repository
curl -sL https://deb.nodesource.com/setup_20.x | sudo -E bash -
# Install Node.js
sudo apt-get install -y nodejs
# Test
node -v
- Download the SAGE3 Linux AMD64 Server Package and extract it within the WSL subsystem
# Open Powershell and switch to WSL
wsl

# Download the file if not done already
curl -LJO https://github.com/SAGE-3/next/releases/download/server-1.4/SAGE3-1.4-linux-amd64.tgz

# Move the downloaded file to your user's home folder
mv SAGE3-1.4-linux-amd64.tgz ~
cd ~

# Extract file
tar xvfz SAGE3-1.4-linux-amd64.tgz
cd SAGE3-1.4
- Copy your SSL Certificates to the configurations folder. There should be two files, your PRIVATE key and the CERTIFICATE file
# Open Powershell and switch to WSL
wsl

# Copy SSL Certs to the SAGE3 Keys folder. Remember these names for later when setting up the configuration file (step 8).
cp PRIVATE_KEY_FILE ~/SAGE3-1.4/configurations/node/keys
cp CERTIFICATE_FILE ~/SAGE3-1.4/configurations/node/keys
- Generate JWT Keys and Token
# Open Powershell and switch to WSL
wsl

# Switch to the SAGE3 Node Keys Directory
cd ~/SAGE3-1.4/configurations/node/keys

# Generate JWT Keys and Token
./genJWT_keys.sh
./genJWT_token.sh
- Edit the
.envFile
# Open Powershell and switch to WSL
wsl

# Change directory to the SAGE3 Server Folder
cd ~/SAGE3-1.4

# Edit .env file with your preferred editor
vim .env
SAGE3_SERVER=YOUR_SERVERS_HOST_NAME
TOKEN= # token value copied without “” from: configurations/node/keys/token.json
- Edit the Configuration file
sage3-prod.hjson
# Open Powershell and switch to WSL
wsl

# Change directory to the SAGE3 Server Node Folder
cd ~/SAGE3-1.4/configurations/node

# Edit the sage3-prod.hjson file with your preferred editor
# The file is documented with instructions.
vim sage3-prod.hjson
-
Start Docker Desktop within Windows
-
Pull the Docker Images
# Open Powershell and switch to WSL
wsl

# Change to the SAGE3 Server Directory
cd ~/SAGE3-1.4

# Pull images
sudo docker compose pull

# Might take a while but the results should be similar to:
Pulling redis-server ... done
Pulling node-server  ... done
Pulling python       ... done
Pulling jupyter      ... done
Pulling fluentd      ... done
pulling fastapi      ... done
- Start the Server
# Open Powershell and switch to WSL
wsl

# Change to the SAGE3 Server Directory
cd ~/SAGE3-1.4

# Start Server
./GO

# To Stop the Server
./STOP
MacOS
- Install Docker Desktop for macOS
- Make sure to select the architecture (M1 or Intel) that matches your machine
- Install NodeJS 20.xx
- Navigate to NodeJS Downloads and download the latest v20.x of NodeJS for your machine
- Download a SAGE3 server package:
- SAGE3 macOS ARM64 Server Package for Arm CPUs and extract it
- SAGE3 Linux AMD64 Server Package for Intel CPUs and extract it
# Open a Terminal

# Move the downloaded file to your user's home folder
mv SAGE3-1.4-linux-arm64.tgz ~
cd ~

# Extract file
tar xvfz SAGE3-1.4-linux-arm64.tgz
cd SAGE3-1.4
- Copy your SSL Certificates to the configurations folder. There should be two files, your PRIVATE key and the CERTIFICATE file
# Open a Terminal

# Copy SSL Certs to the SAGE3 Keys folder. Remember these names for later when setting up the configuration file (step 7).
cp PRIVATE_KEY_FILE ~/SAGE3-1.4/configurations/node/keys
cp CERTIFICATE_FILE ~/SAGE3-1.4/configurations/node/keys
- Generate JWT Keys and Token
# Open a Terminal

# Switch to the SAGE3 Node Keys Directory
cd ~/SAGE3-1.4/configurations/node/keys

# Generate JWT Keys and Token
./genJWT_keys.sh
./genJWT_token.sh
- Edit the
.envFile
# Open a Terminal

# Change directory to the SAGE3 Server Folder
cd ~/SAGE3-1.4

# Edit .env file with your preferred editor
vim .env
SAGE3_SERVER=YOUR_SERVERS_HOST_NAME
TOKEN= # token value copied without “” from: configurations/node/keys/token.json
- Edit the Configuration file
sage3-prod.hjson
# Open a Terminal

# Change directory to the SAGE3 Server Node Folder
cd ~/SAGE3-1.4/configurations

# Edit the sage3-prod.hjson file with your preferred editor
# The file is documented with instructions.
vim sage3-prod.hjson
-
Start Docker Desktop for macOS
-
Pull the Docker Images
# Open a Terminal

# Change to the SAGE3 Server Directory
cd ~/SAGE3-1.4

# Pull images
docker compose pull

# Might take a while but the results should be similar to:
 ✔ redis-server Pulled                                                                            0.3s
 ✔ node-server Pulled                                                                             0.3s
 ✔ seer Pulled                                                                                    0.3s
 ✔ fluentd-server Pulled                                                                          0.3s
 ✔ jupyter Pulled                                                                                 1.1s
 ✔ chromadb Pulled                                                                                0.3s
 ✔ kernelserver Pulled                                                                            0.2s
- Start the Server
# Open a Terminal

# Change to the SAGE3 Server Directory
cd ~/SAGE3-1.4

# Start Server
./GO

# To Stop the Server
./STOP
Configuration
The server configuration file is located here: /configurations/node/sage3-prod.hjson.
This is a JSON file that support comments and slightly more relaxed syntax. Make sure to stop the server (./STOP) before editing the file, and restart the server afterwards (./GO)
This file allows you to configure your server to your specific needs.
{
   // Is the server in production mode.
   // Leave as true if you are deploying your server.
  "production": true,

   // Name of the server to show in the UI
  "serverName": "My Local Server",

  // HTTP Settings
  "port": 443,
  "tlsVersion": "TLSv1.2",

  // SSL Certificate names
  "ssl": {
    // Located in the `/configurations/node/keys' folder
    "certificateFile": "localhost-server.crt",
    "certificateKeyFile": "localhost-server.key"
  },

  // These can be left alone, they are used to find the assets
  "root": ".",
  "public": "dist/apps/homebase/assets",
  "assets": "dist/apps/webapp/assets/",

  // Redis Database Config
  "redis": {
    // The Redis Database URL.
    // If using the default deployment, leave as such.
    "url": "redis://redis-server:6379"
  },

  // Fluentd log configuration
  "fluentd": {
    "server": "fluentd-server",
    "port": 24224,
    "databaseLevel": "partial" // all | partial | none
  },

  // Webserver configuration
  "webserver": {
    "logLevel": "all", // all | partial | none,
    "uploadLimit": "5GB" // file upload size limit in string, optional units: KB, MB, GB, TB
  },

  // Fastapi python server for kernels
  "kernels": {
    "url": "http://kernelserver:8000"
  },
  // Fastapi python server for agents
  "agents": {
    "url": "http://seer:9999"
  },

  // Feedback URL
  "feedback": {
    "url": "http://sage3-server-status.cis230038.projects.jetstream-cloud.org:3000/feedback"
  },

 // External Services
 "services": {
    // To enable screen sharing you must register for a Twilio account.
    // Video Rooms is the Twilio feature we use for ScreenSharing.
    // After setting this, ensure 'Screenshare' is in the 'features.apps` array.
    twilio: {
      // Your Account SID from www.twilio.com/console
      accountSid: "",
      // API Key.
      apiKey: "",
      // API Secret
      apiSecret: ""
    },
    "openai": {
      // API Key
      "apiKey": "",
      // Model name: gpt-3.5-turbo, gpt-4, gpt-4o-mini, ...
      "model": "gpt-4o-mini"
    },
    "llama": {
      "url": "https://arcade.evl.uic.edu/llama32-11B-vision",
      "model": "meta/llama-3.2-11b-vision-instruct",
      "apiKey": "",
      "max_tokens": 1000
    },
    "codellama": {
      "url": "https://arcade.evl.uic.edu/codellama",
      "apiKey": "",
      "max_tokens": 400
    },
    "yolo": {
      "url": "https://arcade.evl.uic.edu/yolov8",
      "apiKey": ""
    }
  },

  // How to enable/disable some features for safety
  "features": {
    // Enable Plugins. Allows uploading of Webapps.
    plugins: true,
    // Which Apps to enable.  Available Apps:
    apps: ["Chat", "CodeEditor", "MapGL", "Notepad", "SageCell", "Stickie", "Screenshare", "Webview", "Poll", "TLDraw", "Calculator", "Hawaii Mesonet"]
  },

  // Auth Configuration
  "auth": {
    // Secret HASH for the sessions. Change this to something unique.
    "sessionSecret": "SUPERSECRET!!$$",
    // Max age for a session per user. In milliseconds. 7 days
    "sessionMaxAge": 604800000,
    // Which login strategies to enable for the server.
    // If you enbable them ensure you add the relevant config information below.
    "strategies": [
      "google",
      "apple",
      "cilogon",
      "guest",
      "spectator",
      "jwt"
    ],
    // A List of emails to enable those users to be admins.
    // This will enable a ADMIN page for these users.
    "admins": [ "toto@example.com", "john@google.com" ],
    // Guest configuration
    "guestConfig": {
      // Endpoint for the guest login. No need to change this
      "routeEndpoint": "/auth/guest"
    },
    // Spectator configuration
    "spectatorConfig": {
      // Endpoint for the spectator login. No need to change this
      "routeEndpoint": "/auth/spectator"
    },
    // Google configuration
    "googleConfig": {
      // Client ID from the Google Developer Console
      "clientID": "",
      // Client Secret from the Google Developer Console
      "clientSecret": "",
      // Endpoint for the google login
      "routeEndpoint": "/auth/google",
      // Callback URL for the google login
      "callbackURL": "/auth/google/redirect"
    },
    // Apple configuration
    "appleConfig": {
      // It is the service id name
      "clientID": "",
      // Your Apple developer team ID
      "teamID": "",
      // Key ID
      "keyID": "",
      // Private key file location
      "privateKeyLocation": "./keys/apple-key.p8",
      "callbackURL": "/auth/apple/redirect",
      "routeEndpoint": "/auth/apple"
    },
    // JWT configuration
    "jwtConfig": {
      // The issuer of the JWT
      "issuer": "sage3app@gmail.com",
      // The audience of the JWT
      "audience": "sage3.app",
      // Public key location. Leave this alone
      "publicKey": "./keys/jwt_public.pem",
      // JWT Route endpoint
      "routeEndpoint": "/auth/jwt"
    },
    // CILogon configuration
    "cilogonConfig": {
      // Client ID from CILogon
      "clientID": "",
      // Client Secret from CILogon
      "clientSecret": "",
      // Endpoint for the cilogon login
      "routeEndpoint": "/auth/cilogon",
      // Callback URL for the cilogon login
      "callbackURL": "/auth/cilogon/redirect"
    }
  },
  // Namespace for signing UUID v5 keys: generate yours or https://www.uuidtools.com/generate/v4
  "namespace": "XXXXXXXX-XXXX-XXXX-XXXX-XXXXXXXXXXXX"
}
AI Configuration
- Put your OpenAI key to be used on your server. You can create a key and allocate a budget at (OpenAI)[https://platform.openai.com/api-keys].
- You can use any of the OpenAI models available. The model name can be found at the OpenAI website.
- When processing PDF files, we use the OpenAI embedded model. PDF analysis might not work without an OpenAI key at this time (January 2025).
- The Llama model is hosted at the University of Illinois at Chicago. You can use the model without an API key.
- To disable AI, leave the openai apiKey empty and leave the llama url empty.
    "openai": {
      // API Key
      "apiKey": "",
      // Model name: gpt-3.5-turbo, gpt-4, gpt-4o-mini, ...
      "model": "gpt-4o-mini"
    },
    "llama": {
      "url": "https://arcade.evl.uic.edu/llama32-11B-vision",
      "model": "meta/llama-3.2-11b-vision-instruct",
      "apiKey": "",
      "max_tokens": 1000
    },
Status and problem solving
To check if the state of the system, you can use docker commands:
- List the docker images present on the system:
> docker images
REPOSITORY                     TAG       IMAGE ID       CREATED        SIZE
REPOSITORY                             TAG               IMAGE ID       CREATED        SIZE
ghcr.io/sage-3/agents                  dev_arm64         ffaf2a339c7b   22 hours ago   3.73GB
ghcr.io/sage-3/next                    dev_arm64         1305e9592af5   22 hours ago   2.14GB
fluent/fluentd                         edge-debian       899f6c4f419f   5 weeks ago    235MB
chromadb/chroma                        0.5.16            ec7fe55aac18   2 months ago   479MB
redis/redis-stack-server               latest            a5ac850ed6cb   3 months ago   403MB
ghcr.io/sage-3/sagekernelserver        arm64             324f16bba2e9   6 months ago   1.07GB
quay.io/jupyter/datascience-notebook   2024-05-27        0752ac24b52d   7 months ago   5.53GB
- Check system status
> docker ps
CONTAINER ID   IMAGE                             COMMAND                  CREATED        STATUS                  PORTS                      NAMES
20a136469e25   ghcr.io/sage-3/sagekernelserver:arm64             "python src/main.py …"   22 hours ago   Up 22 hours (healthy)   127.0.0.1:8000->8000/tcp               sage3-10-kernelserver-1
b93c18e46325   d5df36d8db59                                      "docker-entrypoint.s…"   22 hours ago   Up 22 hours (healthy)   0.0.0.0:443->443/tcp                   sage3-10-node-server-1
e3a6448d6df2   7fc39679f348                                      "fastapi run main.py…"   22 hours ago   Up 22 hours (healthy)   127.0.0.1:9999->9999/tcp               sage3-10-seer-1
5bc7b93c6bf5   quay.io/jupyter/datascience-notebook:2024-05-27   "tini -g -- start.sh…"   22 hours ago   Up 22 hours (healthy)   127.0.0.1:8888->8888/tcp               sage3-10-jupyter-1
b6a3ae3c7244   chromadb/chroma:0.5.16                            "/docker_entrypoint.…"   22 hours ago   Up 22 hours (healthy)   127.0.0.1:8100->8000/tcp               sage3-10-chromadb-1
4776cdcfedf9   redis/redis-stack-server:latest                   "redis-server /conf/…"   22 hours ago   Up 22 hours             127.0.0.1:6379->6379/tcp               sage3-10-redis-server-1
b2d60836dee3   fluent/fluentd:edge-debian                        "tini -- /bin/entryp…"   22 hours ago   Up 22 hours             5140/tcp, 127.0.0.1:24224->24224/tcp   sage3-10-fluentd-server-1
- See logs of a container
> docker logs sage3-10-node-server-1
Mode> production
HTTPS> listening on port 443
Google Login> Setup done
Apple Login> Setup done
JWT> Login setup done
Guest Login> Setup done
CILogon Login> Setup done
...
Services
Google Login
To enable Google Login for users from the Login page you must setup a Google Cloud account. Google OAuth is a free service that allows users to sign into SAGE3 with their Google Accounts.
-
Login to your Google account from the Google Cloud Platform website.
-
Click
Consolein the upper right corner.
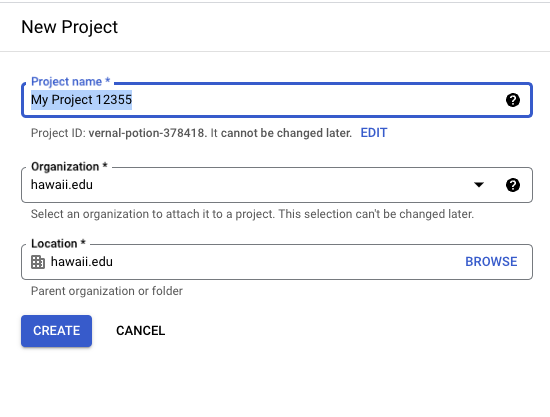
- Create a
New Projectfrom theManage Resourcespage. Can be found using the search box at the top of the page.

- Click
CREATE PROJECT.

- Enter the information and click
Create. (The information here is just organization/hierarchy information.) It might take a few minutes for it to be created.
-
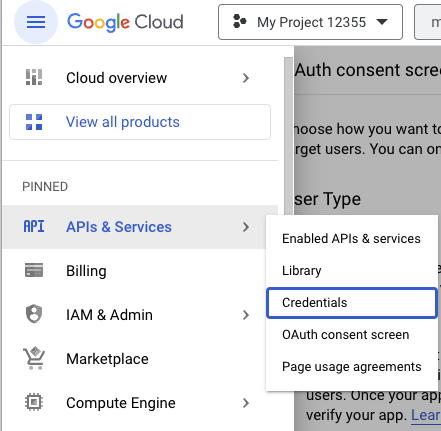
Go back to the homepage by clicking the Google Cloud icon in the upper left corner.
-
From the drop down menu at the top of the page select your newly created project.

- Open the
Credentialspage from the main dropdown menu.
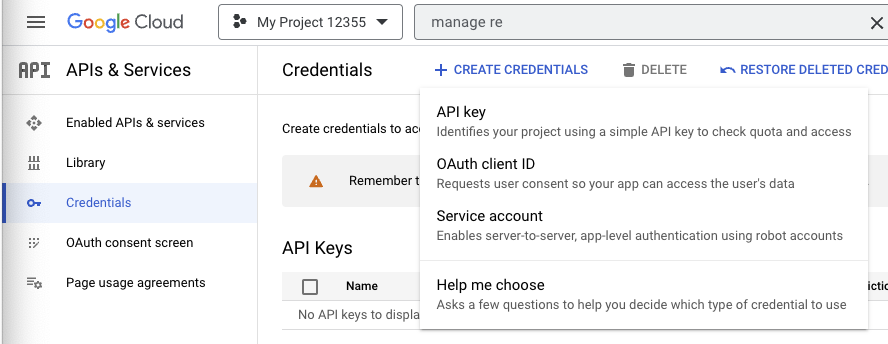
- Click
Create Credentialsand selectOAuth client ID
-
If it requests to
Configure Consent Screenclick the button. If not continue to step 15. -
OAuth Consent Screen. Select External and click create. Enter the information below. All the other fields can be left blank.
- App name: The Name of the SAGE3 Server.
- User support email: The email of the person managing your SAGE3 server.
- Authorized Domain: The
domainof your SAGE3 Server. (Ex. Forhttps://sage3.manoa.hawaii.eduit ishawaii.edu) - Developer contact information: The email of the person managing your SAGE3 server.
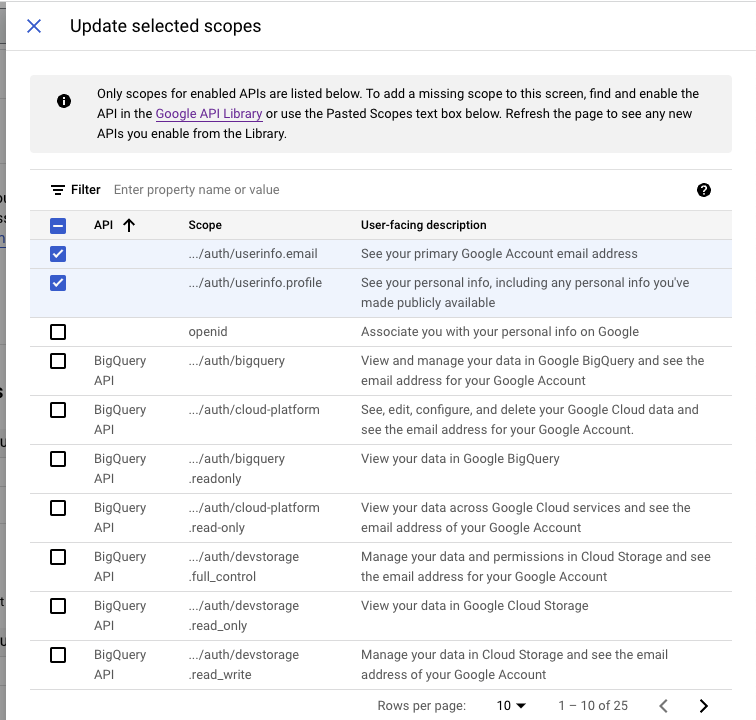
- Scopes. Click
ADD OR REMOVE SCOPESand select../auth/userinfo.emailand../auth/userinfo.profilethen clickUPDATE. Then clickSAVE AND CONTINUE
-
Test Users. Click
SAVE AND CONTINUE -
Summary. Click
BACK TO DASHBOARD -
Create OAuth client ID.
- Application Type:
Web application. - Name: The name of your OAuth 2.0 client. This name is only used to identify the client in the console and will not be shown to end users.
- Authorized JavaScript origin: Click
ADD URIand enter you server's URL. (Ex.https://sage3.manoa.hawaii.edu) - Authorized Redirect URIs: Click
ADD URIand enter you server's URL with the route/auth/google/redirectattached. (Ex.https://sage3.manoa.hawaii.edu/auth/google/redirect)
- Click
CREATEand you should be shown the following screen with yourCLIENT_IDandCLIENT_SECRET.
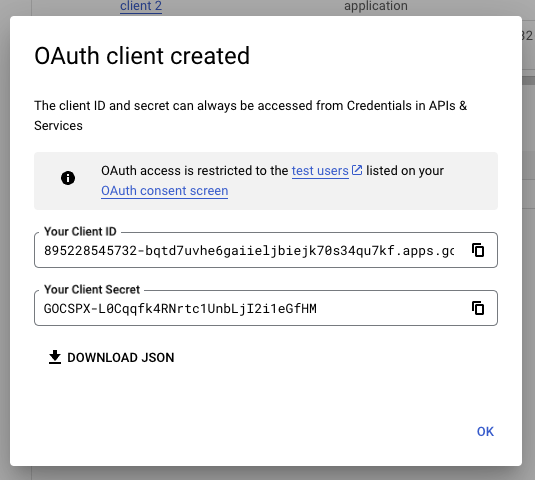
-
Copy the
CLIENT_IDandCLIENT_SECRETinto the SAGE3 Server Configuration file located here:/configurations/node/sage3-prod.hjson. They should be copied in theauth.googleConfigfields underclientIDandclientSecret. -
Ensure within the SAGE3 Server Configuration you have
googlelisted in theauth.strategiesarray.
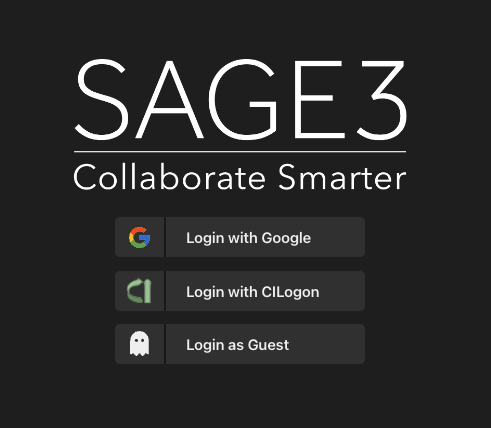
Test logging into your SAGE3 server using the Login with Google button on the homepage.
Apple Login
- Need an Apple Developer Account: https://developer.apple.com/account
- Documentation:
- Official documentation: "Sign in with Apple JS" https://developer.apple.com/documentation/sign_in_with_apple/sign_in_with_apple_js
- Module documentation: https://github.com/ananay/apple-auth/blob/master/SETUP.md
- You will need several items:
- Create a new App ID:
- Navigate down to "Capabilities", and select "Sign in with Apple".
- Create a service ID
- Fill out the details, and click configure on "Sign in with Apple".
- "Domains and Subdomains": the hostname of your server (e.g.
sage3.hawaii.edu) - "Return URLs": the URL called back by Apple after login (e.g. https://sage3.hawaii.edu/auth/apple/redirect)
- "Domains and Subdomains": the hostname of your server (e.g.
- Fill out the details, and click configure on "Sign in with Apple".
- Create a key:
- Go to the "Keys" section in your Developer account and create a key and configure on the "Sign in with Apple" option. Click continue and register. Click on
Download(your only chance) and rename itapple-key.p8.
- Go to the "Keys" section in your Developer account and create a key and configure on the "Sign in with Apple" option. Click continue and register. Click on
- Create a new App ID:
- Configuring SAGE3:
    // Apple configuration
    "appleConfig": {
      // This is actually called the "Service ID" that you created in the 'Identifiers' section
      "clientID": "something com.sage3.blabla",
      // Your Apple developer team ID: 10-character string, upper-case letters and numbers
      "teamID": "XXXXXXXXXX",
      // keyID is the identifier for the private key you generated: 10-character string, upper-case letters and numbers
      "keyID": "XXXXXXXXXX",
      // Private key file location that you downloaded
      "privateKeyLocation": "./keys/apple-key.p8",
      // The URL that Apple will call back after login, no need to change
      "callbackURL": "/auth/apple/redirect",
      "routeEndpoint": "/auth/apple"
    },
CILogon
To enable CILogon Login for users from the Login page you must request a CILogon. CILogon provides a standards-compliant OpenID Connect (OAuth 2.0) interface to federated authentication for cyberinfrastructure.
Instructions to do so are located here:
CILogon OpenID Connect (OAuth 2.0)
To register, use this link: CILogon Client Registration
- Client Name: The Client Name is displayed to end-users on the Identity Provider selection page.
- Contact Email: This email address is used for operational notices regarding your client and for validating your affiliation. A mailing list address for your operations team is recommended.
- Home URL: URL of the Server (Ex. https://sage3.manoa.hawaii.edu)
- Callback URLs: To ensure CILogon redirects back to the SAGE3 server after the user logins, postfix your server URL with:
/auth/cilogon/redirect. (Ex. https://sage3.manoa.hawaii.edu/auth/cilogon/redirect) - Client Type: Confidential
- Scopes: Ensure
openidandemailare selected. - Refresh Tokens: No
After Registering the Client you should be shown a Client Identifier and Client Secret.

Copy this down somewhere safe. OpenID OIDC should email you at the contact email from above within a day or two to confirm your request has been approved.
With in the Server Configuration file configurations/node/sage3-prod.hjson under the auth.cilogonConfig paste the Client Identifier and the Client Secret into their respective fields. Also ensure the array auth.strategies contains cilogon to enable the feature.
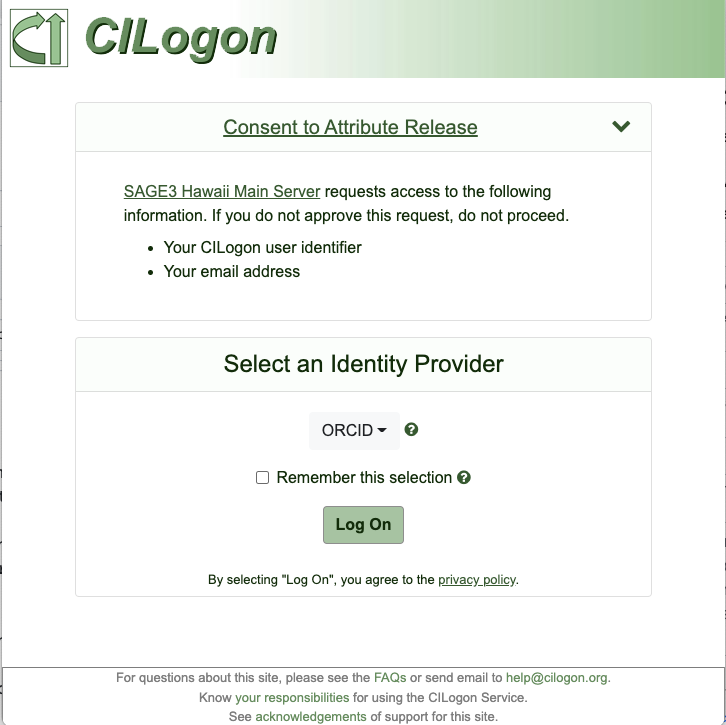
Test logging into your SAGE3 server using the Login with CILogon button on the homepage.
Which should redirect to a page that looks like:
Twilio
Twilio provides programmable communication tools for handling the Screenshare portion of SAGE3. It's an affordable option and allows multiple screenshares within board. SAGE3 uses Twilio's Video Groups and more information about it can be found here.
To enable screen sharing on your SAGE3 server:
-
Signup for a Twilio Account. Twilio Registration
-
Verify your account.
-
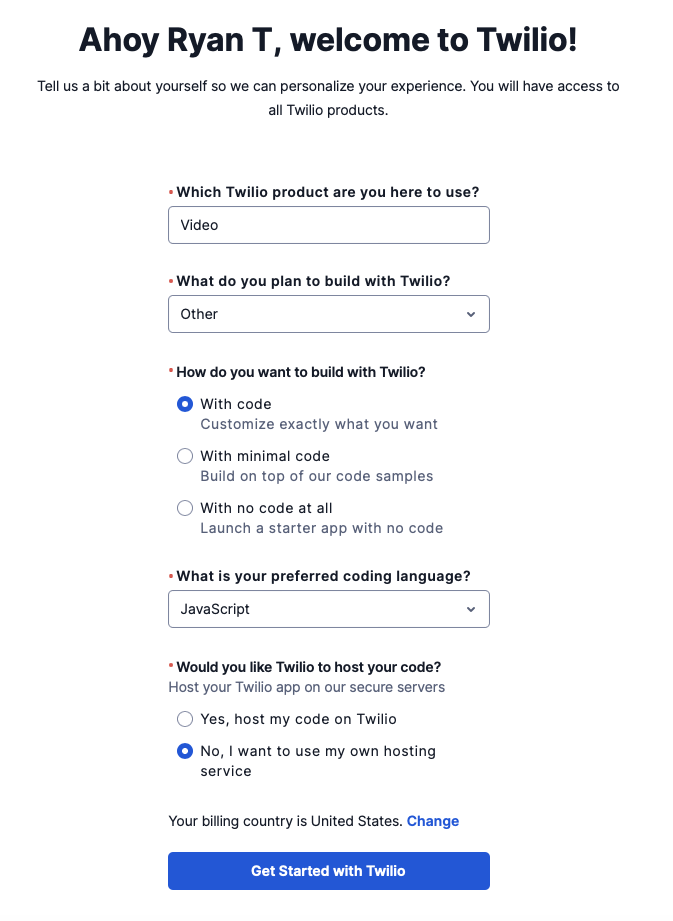
After creating you should be shown the page below. Select:
VideoOtherWith codeJavaScriptNo, I want to use my own hosting service
Then click Get Started with Twilio.
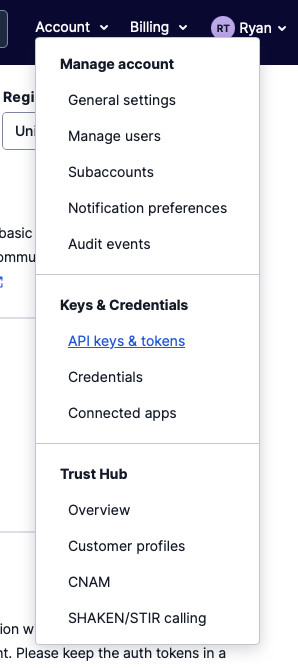
- Navigate to the
Auth Token & API Keys
-
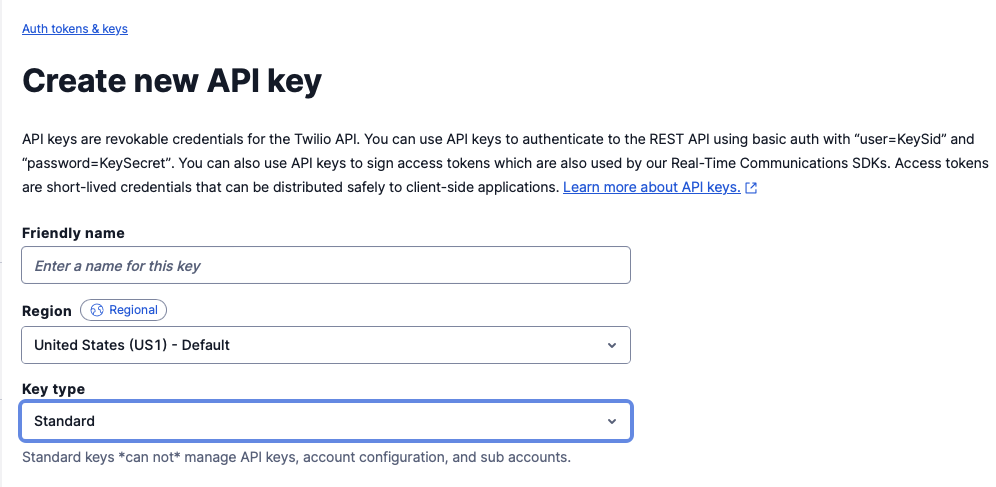
Click
Create API key -
Fill in the form.
- Friendly name: A friendly name for this
API Keythat shows in the Twilio console. - Region: Select the region that is closest to the majority of your SAGE3 users.
- Key type: Standard
-
You will then be shown your
SIDandSecret. Copy these down somewhere safe. ClickDone. -
Navigate to the
Auth Token & API Keys -
Under
Live credentialscopy down theAccount SID. -
You will now have three keys/tokens.
Account SID,SID, andSecret. -
Copy these keys/tokens to the SAGE3 Server Configuration file located
/configurations/node/sage3-prod.hjson. Under theservices.twilioenter the three keys/tokens into the following fields:
- accountSid:
Account SID - apiKey:
SID - apiSecret:
Secret
- Ensure the "Screenshare" app is enabled by adding "Screenshare" to the
features.appsarray in the SAGE3 Server Configuration file located/configurations/node/sage3-prod.hjson.